For more than half a century, LINOTYPE has maintained a policy of sharing the technical experience of engineers, plant machinists, and operators with Linotype users everywhere. The Linotype Life Extension series of booklets, of which this is one, has been compiled and distributed in the interest of maximum production with minimum waste and delay, through continuous operation.
LINOTYPE, BROOKLYN, NEW YORK
NEW YORK CITY * CHICAGO * SAN FRANCISCO * NEW ORLEANS
CANADIAN LINOTYPE, LIMITED, TORONTO, CANADA
Not Merely Pieces of Brass
Linotype matrices are not stamped-out pieces of brass as many suppose. They are the product of mechanical operations which are actually finer and more delicate than many of the operations that go into the making of a fine watch. This is necessary in order to meet the close standards of modern printing processes. Because they thus merit the best of care at the hands of users, these pages are appropriately dedicated to Linotype Matrices.
"Carelessness does more harm
than a want of knowledge!"
-BENJAMIN FRANKLIN
Copyright, 1942, by Mergenthaler Linotype Company
Reprint only by permission. Printed in U. S. A.
Reprinted with the permission of Heidelberger Druckmaschinen Aktiengesellschaft
THE DICTIONARY gives as one of the definitions of the word matrix, "a mold in which printers' letters are cast." Immediately the matrix assumes a position of paramount importance to the printer, for he realizes that the ultimate quality of their product lies in the perfection of the type mold, or matrix.
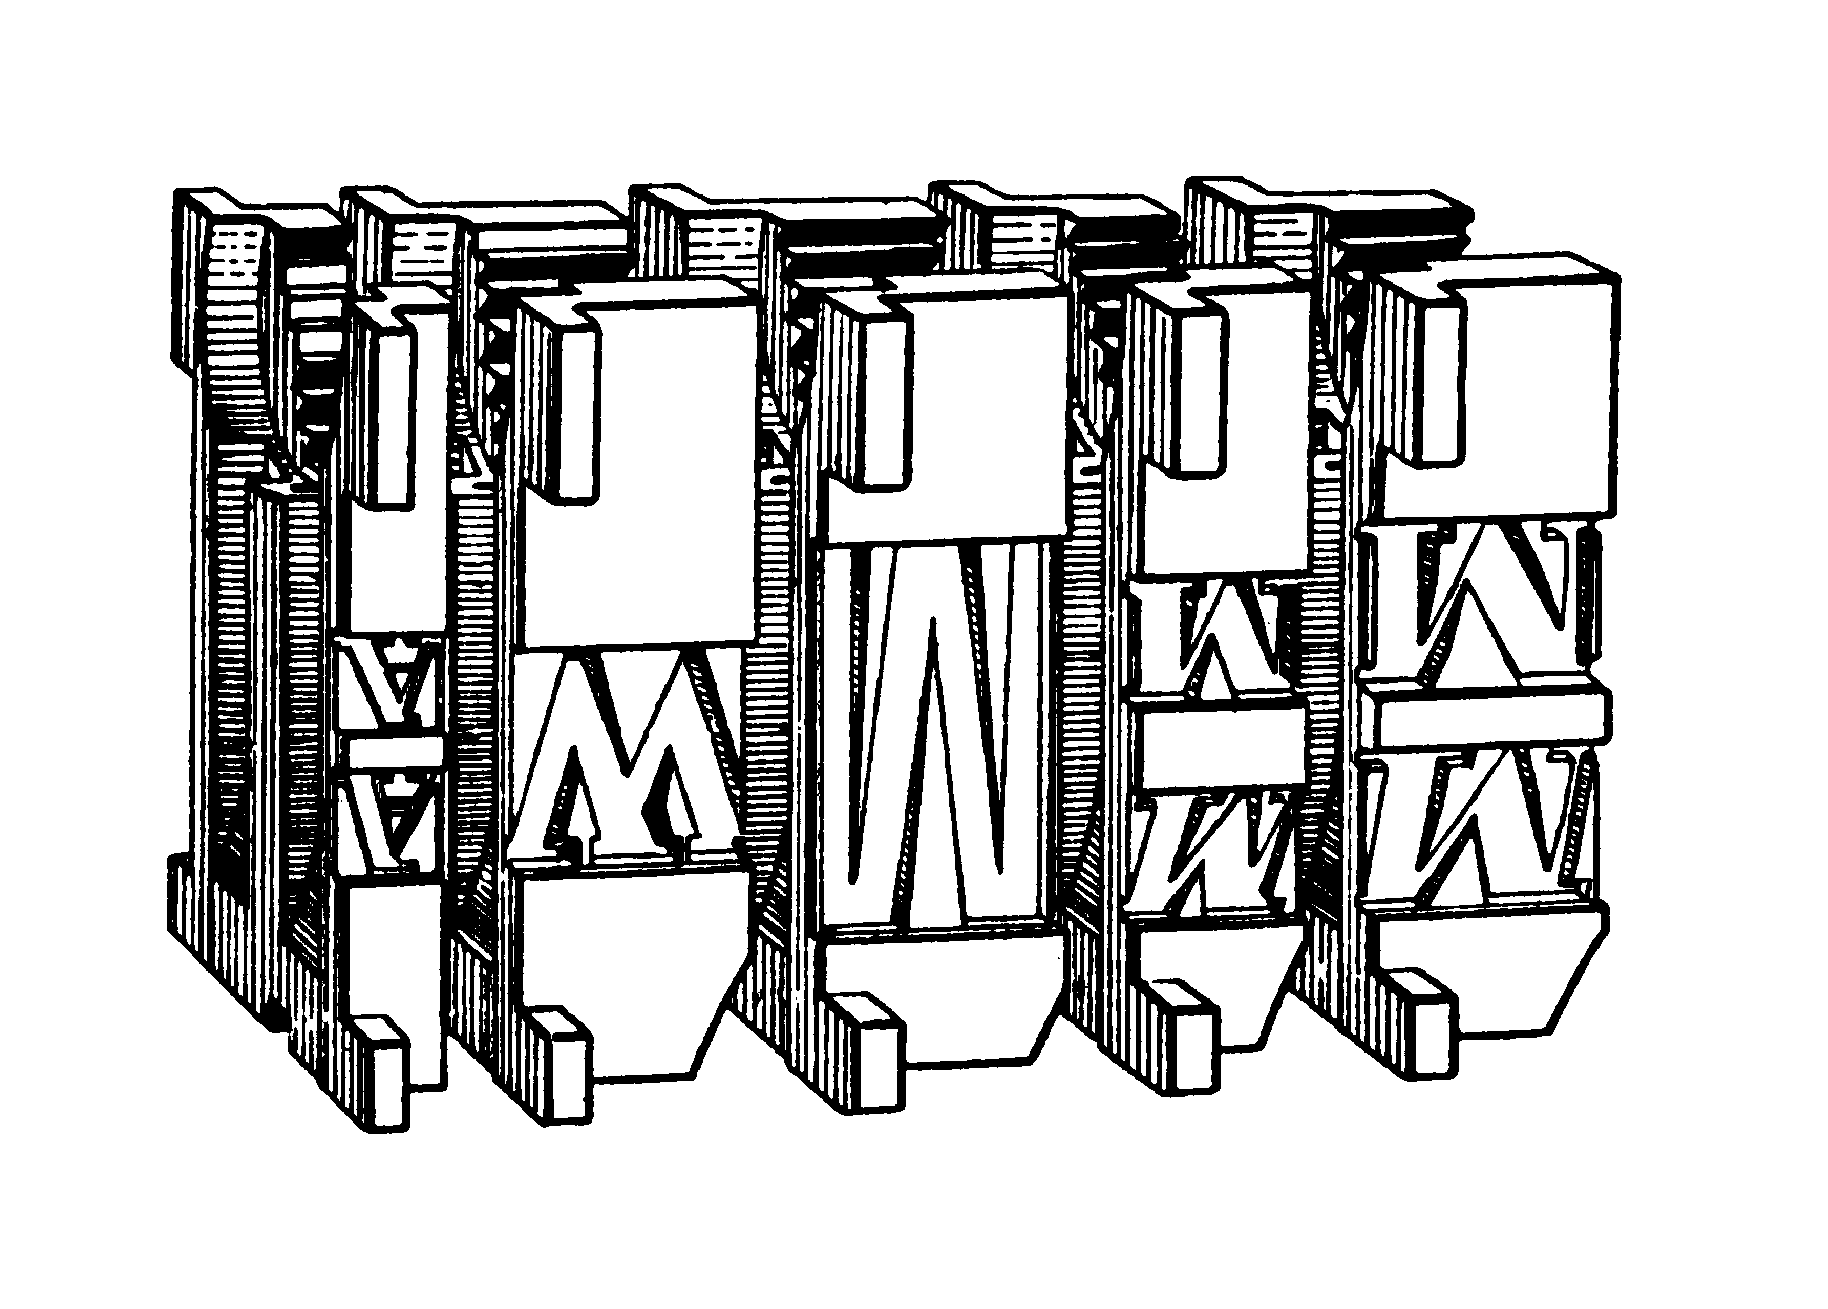
Linotype matrix distribution is, in many ways, the most ingenious part of the whole machine. It has been achieved through the use of matrix tooth combinations, each character running in the magazine having its own particular combination. The term "tooth combination" refers to the teeth 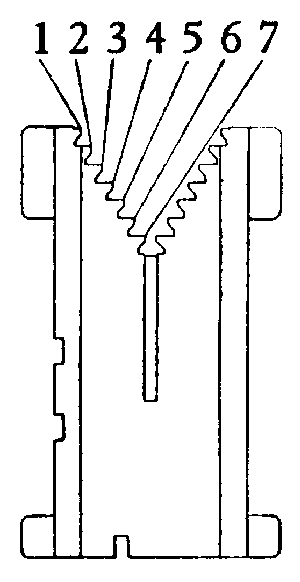 or projections on the inside of the "v" notch of the matrix. There are seven of these teeth on each side as illustrated. The various combinations of matrix and distributor bar make it possible for the matrices to find their proper magazine channels properly and automatically. In this way the matrices are used over and over. Properly cared for, they will wear indefinitely. Carelessly used, without attention being given to machine adjustments, matrices suffer unnecessarily.
The lugs, or "ears" as they are sometimes called are equally important in the proper functioning of matrices, since they control the alignment of each letter in the lines and are the key to fine composition or just the reverse, if abused or improperly cared for.
The importance of proper matrix care cannot be overly stressed. There are some fundamental conditions which should be kept in mind. Intelligent and frequent checkups of the matrices themselves and the mechanisms affecting their operation will contribute to continued satisfaction. On the pages that follow are some useful pointers.
To Safeguard Matrix Teeth
The matrix should travel from one position or transfer point to another with a maximum of smoothness and with a minimum of friction and resultant wear. The teeth of the matrix, as well as the grooves of the second elevator and distributor box bars, and the segments of the distributor bar are necessarily interdependent and inseparable in maintaining a perfectly coordinated distributing mechanism.
The matrix tooth combination, under ordinary conditions, will last for years. It is possible, however, to ruin a set of matrices in a short time by burring or damaging the teeth. The cause of the tooth combinations becoming injured is invariably due to bad alignment at one or possibly all of the various transfer points.
There are three of these transfers; that is to say, the matrices are transferred at three distinct points where the teeth are involved.
The first transfer is from the first elevator jaw to the second elevator bar at the intermediate channel. A matrix, when in position in the first elevator jaw at the transfer point, should line with the bar so that a perfect transfer to the bar can be obtained without binding. There is an adjusting screw at the bottom of the first elevator slide, on the right hand side, for raising or lowering the slide. The alignment of the first elevator jaw rails and the intermediate channel rails should be perfect. This will take care of the vertical alignment.
Then, to take care of lateral alignment at the point where the matrix is supported by the first elevator jaw rails, and is just sliding on to the second elevator bar, there is an intermediate channel front plate extension which, by means of screw bushings, makes it possible to move the second elevator bar either toward the front or the rear, as may be desirable to secure a true aligning condition of matrix teeth and bar. This is one of the most important adjustments from the standpoint of the matrix teeth, and it should be handled with care to see that the bar is parallel with the channels. The second elevator bar should, of course, be perfectly smooth and free from burrs, as should be the other two bars along which the matrix must travel.
The second transfer is from the second elevator bar to the distributor box bar. The second elevator, when in its normal position, should be so adjusted that the second elevator bar will line up with the distributor box bar.
The third transfer is from the distributor box rails to the distributor bar. These rails should be perfectly square with one another. Place a matrix on the distributor box rails and raise up the outside distributor screw; turn the distributor screws slowly by hand and see that the matrix when supported on the distributor box rails will transfer freely on to the distributor bar.
Perfect alignment should be maintained at all the above mentioned points. It is to the advantage of the Linotype user, in the interest of the long life of matrices, to occasionally check these adjustments and to make slight corrections that may be found necessary.
Repairing Damaged Lugs
If the lugs of matrices become bent, straighten them with a pair of parallel jaw pliers. If a hammer is used to straighten them, care should be taken not to hammer them hard enough to distort their shape.
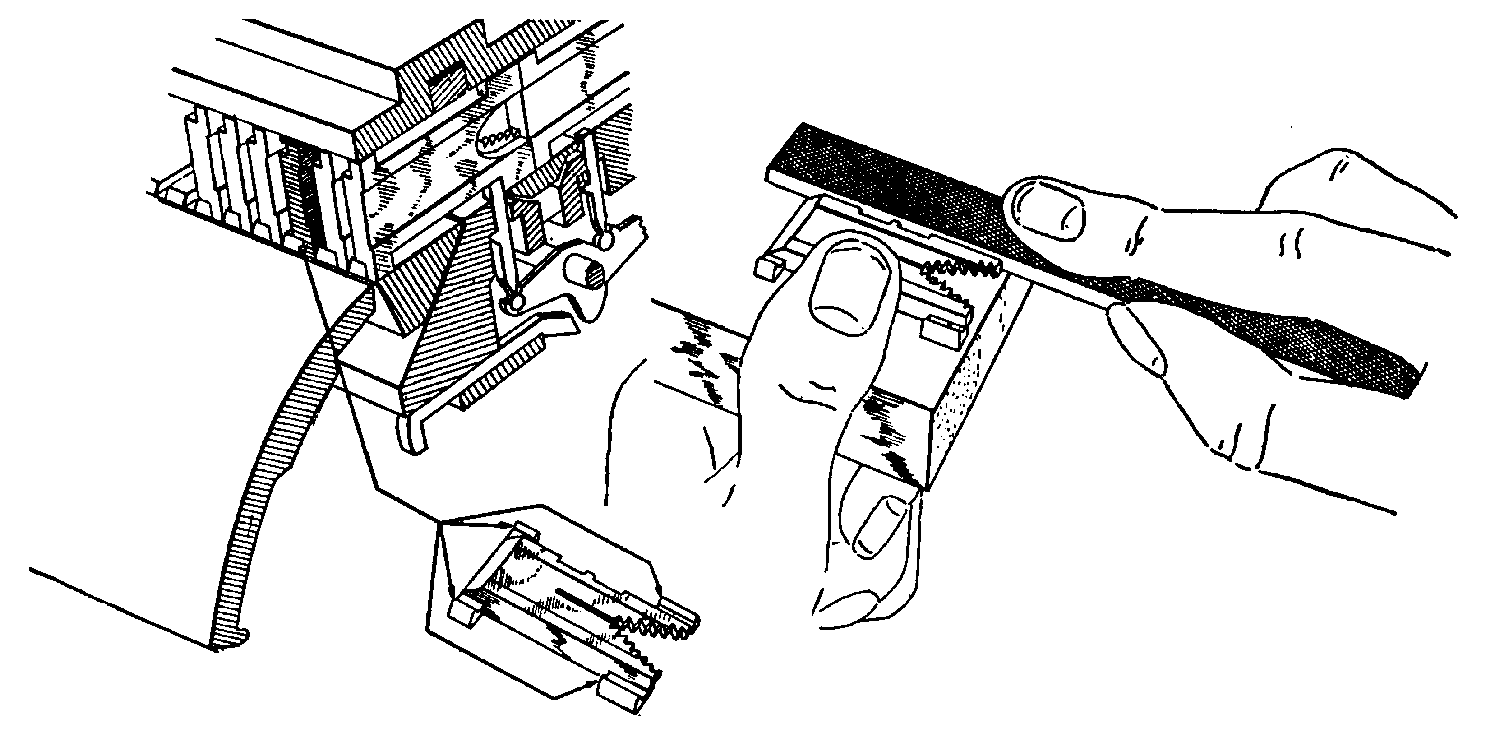
View of portion of magazine and matrix, showing ear burred or sharp edge thrown up which prevents rapid and smooth sliding of matrix through the channel in the magazine. In this view the burr, or projection in the matrix is exaggerated. At the right in this view is shown a board, a matrix, and the method in which the burr, or projection can be removed with a fine file In using a file in this way, only one with a safety edge should be used, and care must be taken not to file away the body, or main portion of the ear, but only the raw edge or burr upon the ear. It too much is filed away especially on thin matrices the lugs will probably catch in the escapement verge pawls.
Preventing Hairlines
Care should be taken to preserve the side walls of matrices. When they are damaged, hairlines will show in the printed matter.
One of the most common causes of damaged side walls is the excessive use of oil on the felt of the back mold wiper or around the machine where it comes in contact with the matrices. In a perfectly justified line there is always a slight amount of air space between the matrices, but not enough to permit metal to pass through. Hot oil, however, has a peculiar capillary attraction for hot metal. Oil from the back mold wiper will flow ahead of hot metal, through the mold and into the small air spaces between the matrices. The hot metal under pressure of the plunger will follow this track of hot oil between the matrices and in time adhere to the side walls. The accumulation on the side walls will gradually build up until they are crushed, and then fins or hairlines will appear between the characters.
If the spacebands are not cleaned regularly, and metal is allowed to accumulate on the sleeves at the casting point this metal will press against the side walls of the matrices, crushing them during the process of justification when the line is wedged tight between the vise jaws, and a font of matrices may be ruined in a very short time. The spacebands must be cleaned at least once during every eight hours of operation.
To clean spacebands, use a soft pine board sprinkled with Dixon's Graphite No. 635, and rub the sleeve of the spaceband to remove any metal that might show at the casting point. If the metal does not rub off easily, scrape with a piece of brass.
Damaged side walls may also be caused by loose lines in combination with an imperfectly adjusted pot pump stop which is actuated by the right-hand vise jaw. See that the pot pump stop is adjusted and the right-hand vise jaw moves freely to prevent casting unless the line is tightly justified.
If tight lines are sent in, the inside lugs of the matrices will be sheared or burred when the mold comes against them, especially if the vise automatic is out of adjustment and the machine goes too far ahead before throwing out the clutch. If a tight line is sent in and stops between the jaws, it should be possible to lift the first elevator slide to remove a matrix from the jaws without turning the machine backward. Care should be taken in these matters as many matrices may be otherwise damaged at this point.
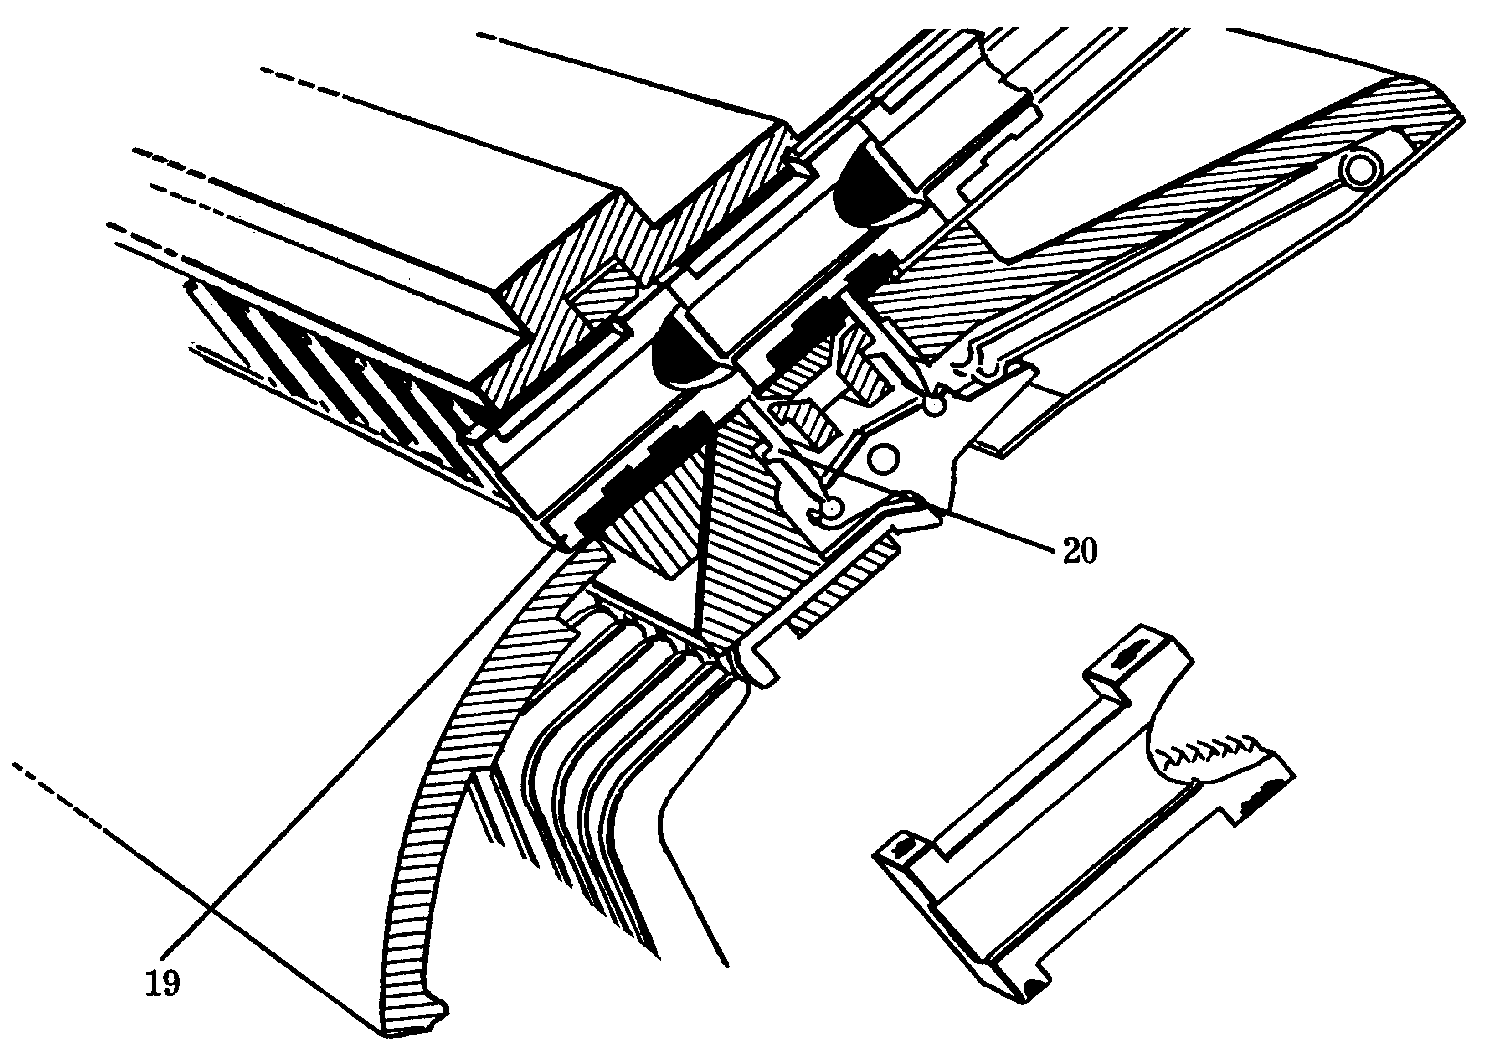
View of a portion of a magazine, the escapement and key reeds, and an enlarged view of the matrix, showing where dirt and gum may accumulate on the matrix lug and prevent its smooth, quick action. The matrices must be kept clean.
The lower lug of the matrix is shown at 19. The original dimension of the lug from front to back is .125". If this lug is sheared or worn too much, when it passes over the hole through which the escapement pawl 20 works, it is apt to fall into the opening and prevent the matrix from dropping.
Cleaning Matrices
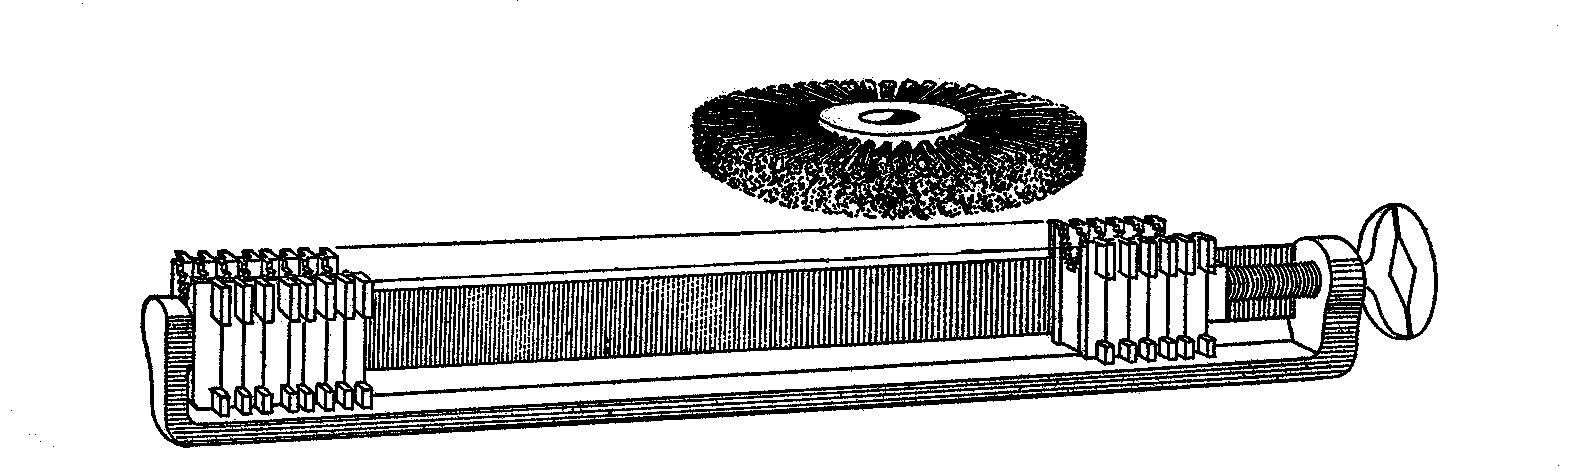
In the first place, care should be exercised to keep matrices clean. Avoid excessive use of graphite, handling with greasy hands, excessive oil in lubrication, etc. (See "Do and Do Not"). When matrices need cleaning, the simplest methods seem to be the best. One of the best known ways is the use of a wire buffer and matrix holder, shown on next page. The buffer is made of very fine wire, is about five inches in diameter and is designed to fit on the arbor of any standard composing-room saw. The holder of the matrices is 20 inches long. With this equipment a font of matrices can be cleaned in a very short time, and by turning the holder at right angles to the buffer it is possible to clean the gum from the sides of the lugs except on the thin matrices. The buffer is available with a 1/2" hole (X-1673), and with a 11/16" hole (X-1674). The holder is listed as X-1672. Another method of cleaning matrices is Dixon Matrix Reference Cleaner (X1604). Place a row of matrices on a type galley and polish the reference side; reverse the matrices and polish the lower lugs. If the lugs have gum on the sides, it may be necessary to rub the matrices over a soft felt to remove it. The wire buffer and matrix holder may be used for cleaning matrices. The buffer may also be used for polishing various other machine parts without damage to them, such as keyboard cams and yokes, key levers, trigger ends, verge escapements, assembler slides, etc. Graphite should never be used on the matrices or in the magazine. It may make the matrices drop well for a short time but in damp weather it is likely to cause gum to accumulate. The principal cause of gum on the matrices and magazines is the excessive use of oil, particularly on the distributor screw bearings. At no time should oil show on the screws, as it eventually gets on the matrices and into the magazines. If a good quality of oil is used, one drop in each bearing every two weeks should be sufficient. The Treatment of New Matrices In order to secure the best results when new fonts of matrices are used in outstanding Linotypes, a few precautionary measures should be taken. For years, Linotype has issued the following instructions in each box of fonts of matrices. Adherence to these simple rules may prevent trouble later. Magazines and spacebands should be thoroughly cleaned. Spacebands which are rounded or damaged at the casting edge or which have the slightest particle of metal adhering to the sleeve at the casting point will damage the Edge walls of new matrices very quickly. Spacebands which have been bent and improperly straightened, that is wedges with kinks or buckles in them, will positively permit metal to flow between the wedge and the adjoining matrix. All spacebands should be carefully micrometered and inspected with a knife straight edge for rounded corners on the sleeves. They should show a micrometer reading which is even when measuring sleeve and wedge together at the casting point on the spaceband and on the front of the band or a plus measurement on the casting side up to .0005 inch. In no case should bands be used which are minus on the casting side. If the corner of the sleeve at the casting point is found to be rounded when examining the bands with a knife straight edge, or with a new piece of hairline rule if a straight edge is not available, new sleeves should be applied, as metal will quickly gather at the casting point of the sleeve under this condition when used with brand new matrices. Both front lockup adjustments should be inspected and properly corrected if this is found to be necessary. While it is possible on old machines to secure satisfactory results with spacebands which are worn and rounded and with front lockup adjustments slightly off, this is possible because of the gradual building up of false side walls on the matrices, and the fact that the wrong condition of spacebands and adjustments gradually came into existence. However, when new matrices are installed, trouble will surely be experienced because of the wrong conditions in the machine and spacebands. Before using new matrices in an old machine it is also important that the vise jaws be checked for squareness, since after a number of years service these jaws will show wear, causing hairlines. To avoid this condition, it is advisable to have these vise jaws reground. At the face alignment position of the machine you should be able to lift the first elevator by hand .010 10 inch, and this measurement should not be exceeded. When two-letter 18 and 24 point matrices are used, this figure is reduced to .005 inch. This test is to be made with a thirty-em line of matrices, without spacebands, in the first elevator jaws. Carefully set the Pump Lever Stop Lever so that when the line is fully justified the stop lever will be open beyond the block on the pump lever not more than 1/64 inch. First elevator link eyebolts and nuts, upper and lower, should be checked and if they show undue wear they should be replaced. Other and important points that should be checked are the back and front mold wipers. Oil in any form used at these points will cause metal to collect on the side of the matrix, crush the sidewall, and result in hairlines. Do not use oil on pot pump plungers after cleaning them, nor should oil be used in the remelting furnace in an attempt to burn dirt out of the metal Adjustment of Mold Cam Lever Eccentric Pin To adjust Mold Slide so that there is proper clearance, between face of Mold and Matrix when justification takes place, the Mold Cam Roll Eccentric Pin must be adjusted when Mold Cam Roll is on section of Mold Slide Cam marked 83 which is the highest point of Cam, and when Mold Cam Roll is on point 83 and Eccentric Pin is properly adjusted the space between face of Mold and the Vise jaws or Matrix should not be less than .003 or over .005. This must be determined by using a thickness gauge. Before making the adjustment of Eccentric Pin, it will be necessary to release the pressure of Pot Lever Spring. This is done by removing Lock Nuts 84 and 85, Wing Pin 86 and Eyebolt 87. Lock Nuts 89 and 90 must not be disturbed. When the adjustment is complete, restore parts 84, 85, 86 and 87 to original position, taking care that space 88 is approximately 3/16 of an inch when Pot is in casting position. To Conserve The Life of Your Matrices DO Clean spacebands every eight hours of service. DO Renew the assembling elevator matrix buffer when it becomes worn. This is a small piece of fiber on the inside of the right-hand end of the assembling elevator. If worn it permits the incoming matrices to strike the steel back rail plate and damage the aligning lugs of the matrices. DO Renew assembling elevator detaining plates, front and back plate, when worn. These are small steel plates on the right-hand end of the assembling elevtor at the bottom and support the matrices in an upright position during assembling. DO Renew assembling elevator gate pawls, front and back, if worn. They prevent the last matrix in the line from falling down and damaging sidewalls and lugs. DO Adjust the assembler chute finger to the proper angle to cause the incoming matrix to strike outside the sidewall area of the preceding matrix in the line This will prevent damage to sidewalls and the resultant hairlines. DO Clean matrices on the lugs only with a rubber eraser or a specially designed rotary metal brush, described elsewhere in this booklet. DO Remove promptly from fonts all matrices that show hairlines from crushed sidewalls or those that are bent or have badly bruised lugs. Such matrices will progressively damage the entire font if allowed to remain in use and come in contact with good matrices during circulation. Many such matrices can be repaired and restored to useful service. DO See that the inside edge of the assembler cover (the small one covering the assembler block) does not project inwardly beyond the line of the inside edge of the large cover. Any projection will cause the matrix lugs to strike and raise a burr. DO See that the pot pump stop is working freely and adjusted to prevent casting short lines. A loosely justified line permits metal to run between matrices and crush sidewalls, resulting in hairlines. DO See that the teeth on the second elevator bar and distributor box bar are free of burrs which may damage the combination teeth. DO Pick up and return to the magazine promptly matrices that fall to the floor. Once stepped on or mixed with metal shavings they are sure to be damaged irreparably. DO Make it a practice to take font proofs occasionally of all characters cast in groups alphabetically. This will enable you to spot and remove damaged matrices before they contaminate the perfect ones. DO Replace star wheels when the edges become rounded. Worn star wheels do not push matrices inside of assembler gate pawls and detents, but cause them to fall back in the assembling elevator and become clogged and damaged. To Conserve The Life of Your Matrices DO NOT Do not dump matrices loosely in a container for cleaning. If benzine or any volatile liquid is used for cleaning, arrange the matrices on a galley and carefully brush the lugs with a brush dipped in the liquid. DO NOT Do not clean matrices with any liquid solvent containing chromic acid. This acid is a brass solvent. Even a weak solution will pit the character, destroy the sidewalls and cause metal to adhere to the sides, resulting in defective type surfaces on the slug and hairlines between the characters. DO NOT Do not use oil on the back mold wiper or to excess in other places where it can come in contact with matrices. Oil on the sides of matrices makes a path for molten metal to be forced between them, This metal gradually builds up on the side and the walls eventually become crushed and produce hairlines. DO NOT Do not operate the keyboard or handle matrices with dirt or grease on your hands. Keep your hands and the machine clean. Greasy dirt is the worst enemy of matrices. DO NOT Do not neglect to clean spacebands once every eight-hour shift. If polished with loose graphite see that loose particles are removed before returning spacebands to the box. DO NOT Do not use graphite on matrices or in magazines. Moisture on the hands or a humid atmosphere causes graphite to form an oily deposit which eventually becomes a hard cake on the sides of the matrices and in the channels. This condition results in the necessity of frequent cleaning and naturally leads to damage through unnecessary handling. The lugs of the matrices may be polished with dry graphite after cleaning. DO NOT Do not force a tight line into the vise jaws. This practice causes the aligning lugs to be sheared and irreparably damaged, and is hard on the spacebands. DO NOT Do not send in loose or short lines unless you are sure the pot pump stop safety is operating perfectly. A front squirt may ruin several dollars' worth of matrices and spacebands. A little care at this point pays good dividends in time and money. DO NOT Do not remove matrices that may have become wedged tightly in a jumbled line in a careless or forceful manner. Go about it easily and carefully, remembering that an average 12-em line contains about $6.00 worth of matrices and spacebands. DO NOT Do not fail to replace that worn star wheel promptly, and thus guard against sending in tight lines. DO NOT Do not overlook the importance of keeping your assembling elevator gate pawls and detaining plates in good condition. They prevent matrices falling out of the first elevator jaws in recasting, which invariably results in serious damage.