Cleanliness and Production
There are those who may question the need for emphasis being placed upon Cleanliness in the maintenance and operation of the Linotype. To such it should be said that a cleanly kept Linotype is a better operating machine for it. Dirt never helps any machine. In a machine which is designed and built to deliver a product whose measurements must be as uniformly accurate as Linotype slugs all dust and dirt should be regularly removed.
Cleanliness is a necessity, if uninterrupted production is expected. A clean, well-maintained Linotype and a clean proof are the measure of craftsmanship.
"Carelessness does more harm
than a want of knowledge!"
-BENJAMIN FRANKLIN
Copyright, 1942, by Mergenthaler Linotype Company
Reprint only by permission. Printed in U. S. A.
Reprinted with the permission of Heidelberger Druckmaschinen Aktiengesellschaft
GENERAL
MAINTENANCE
PART I
Routine Checkups, Cleaning and Lubrication
For more than half a century LINOTYPE has maintained a policy of sharing the technical experience of engineers, plant machinists, and operators with Linotype users everywhere. The Linotype Life Extension series of booklets, of which this is one, has been compiled and distributed in the interest of maximum production with minimum waste and delay through continuous, uninterrupted operation.
Routine Checkups
The productive life of mechanical equipment is dependent upon the treatment it is accorded more than upon all other factors combined.
Invariably, serious mechanical troubles are the result of minor items, most of which could have been corrected before they became major difficulties. Linotype servicemen know that most of the causes of mechanical breakdowns could have been averted if the user had maintained a regular schedule of checkups, reasonable cleanliness and proper lubrication.
Hence, this series of Linotype booklets, devoted to conservation of machines and equipment -Linotype Life Extension, emphasizes the value of a careful program of maintenance. Routine checkups should be as much a part of Linotype operation as seeing that metal is in the metal pot and copy on the copy holder.
A routine program adaptable for small and medium plants is here suggested which should assure satisfactory operating conditions and well-kept equipment.
|
DAILY SCHEDULE WEEKLY SCHEDULE |
12. Wipe off cams and tighten screws. 13. Clean and oil distributor box. 14. Clean distributor screws and oil bearings. MONTHLY SCHEDULE |
NOTE: For location. of lubricating points and recommended lubricants, consult the instructions and illustrations in the second section of this booklet. For machine adjustments and mechanical descriptions of functions, see the official Linotype manual, "LINOTYPE MACHINE PRINCIPLES:" This is a 487-page completely indexed book which can be procured at any Linotype agency. Price $3.50 postpaid to any part of the United States (X-1752).
Schedule for Large Battery of Linotypes
Large batteries of Linotypes, in plants where several machinists are employed, usually receive systematic checkups in addition to normal operating supervision. Quite naturally, there are various methods employed to accomplish these ends and it would be impossible to say that any one system would be best for all plants.
Nevertheless, one of the most effective schedules noted was developed by Alexander Gordon, late Linotype head-machinist of the Evening Star, Washington, D. C. This schedule of work which has been published and. widely distributed, has been adapted by many large plants to their individual requirements and is printed here for that purpose. It will be noted that the night machinists are responsible for routine repair and maintenance. In addition to this regular schedule any special work which is required to be done on specific machines is indicated in writing, in spaces provided on the blank that is left for the machinists each night. Any comments they may make are written on the reverse of the blank, which thus becomes a report to keep the head machinist informed.
Machinists' Work Schedule
NOTE: An afternoon paper; between 40 and 50 Linotypes, with full day crew and varying night force
|
EVERY DAY Between 8 A. M. and 3 P M. |
Clean plungers, wells and well holes. Skim dross off metal. Measure line from each machine for type-high. Check and oil Mohr Lino-Saws Set temperature of metal. After 3 P M. |
The above are EVERY DAY "MUSTS"
|
MONDAY TUESDAY WEDNESDAY |
Oil distributors, keyboard rollers, assembler boxes and pulleys (half plant). Oil assembler slide rollers. Examine machines for adjustments, loose screws, bolts, nuts. Oil assembler bearings; clean off matrix delivery belt supporting plates. THURSDAY FRIDAY SATURDAY |
|
Clean soot from around mouth and pot gas burners. Dust off machines. Clean and oil all bright parts. Clean all commutators. Clean out inside of metal pots. Clean and oil mold disk locking stud blocks. Blow dust from all motors. Clean delivery slide rods. Gasoline auxiliary line safety attachment. Afternoon Shift Clean and oil vises, clean spacebands, clean plungers. New tympan on proof press. SATURDAY NIGHT SUNDAY |
Clean and repair thermostat contact points and magnet switches in panel boxes of electric pots. Put on new star wheels where needed, set measures (half plant). Put on assembling elevator buffers where needed. FIRST WEEK OF EACH MONTH |
One Machine Each Day
|
Clean and repair pot and mouth gas burner. Face off mouthpiece with carborundum stone. Ream holes in mouthpiece. Clean out vents on mouthpiece. Scrape crucible under mouthpiece. Clean and oil keyboard cams. Clean out motor, clean and dress commutator and repair brushes. Sharpen and set back knife. |
Repair knife wiper. Clean assembler entrance plate and guides. Clean, oil and repair distributor box. Repair one set spacebands. Clean one set mats and magazine. Examine lower case mats in one machine, take out worn and bad mats and put in good ones. Clean and polish molds and liners. Clean driving clutch and leathers. |
Schedule of Night Work
|
MONDAY TUESDAY WEDNESDAY THURSDAY |
Clean plungers, wells and well holes. Skim dross off metal. Clean all spacebands. Repair two sets of spacebands. FRIDAY SATURDAY SUNDAY |
Linotype Lubrication
NOTE: The illustrations appearing on the following pages indicate the oiling points of Models 29,30,31 and 32 and the Self-Quadder. However, they will be found helpful in lubricating other models.
To insure a long life of efficient and trouble-free operation, a systematic plan of machine maintenance should be followed. In this plan, proper lubrication is the most important single factor. So that this may be accomplished in a thorough and systematic manner, there are indicated in the following photographs all of the various oiling points on the machine. In some cases two or more oil holes are shown in one location, and are indicated as (2).
The oil holes are placed in the most convenient and accessible positions practicable. It should be remembered that a few drops of oil applied frequently is more economical and much more efficient than flooding the parts with oil occasionally. In addition to wasting oil, flooding only helps to collect dirt, and in all probability does more harm than good. A piece of waste or cloth should be used to remove all surplus oil from around holes after oiling. Extreme care should be used to prevent any oil from coming in contact with the matrices as it will eventually hinder smooth assembling action.
It is not possible to indicate the desirable frequency, of oiling individual points on the Linotype, as is practicable in the case of an automobile. The widely varying conditions under which Linotypes are operated, with respect to running time, cleanliness and climate, combine to make it a problem best solved locally, through the exercise of simple mechanical judgment. It should be sufficient to point t out that the constantly moving parts call for more frequent attention than those which only contact when the machine makes its periodic cycles.
Particularly important to proper lubrication is the quality of the lubricant. Cheap vegetable oils are a false economy. Always use high-grade machine oils that will not gum. We recommend Linotype oil and grease as it has been thoroughly tested and found efficient. As a guide, with regard to quality and viscosity, we have indicated throughout, by symbol, the proper lubricant for each oiling point. As will be noted, the proper grade oil in the majority of places is our X-24, a medium-weight motor oil (standard S.A.E.20)
Linotype Approved Lubricants
|
* Linotype Oil Part No. X-24 (1/2 gallon can) Keyboard and Distributor Oil Part No. X-1012 (2 oz. bottle) |
* Keyboard Cam Oil Part No.X-101 (2 oz. bottle) § Linotype Grease Part No. X-1204 (5 lb. can) |

1 Second Elevator Guide (Lower) (Apply oil sparingly with finger) **
Also oil hinge pins in Second Elevator sparingly
2 Assembling Elevator Gate Spring Roll **
2a Knife Block Slide Oil Holes (2)
2b Knife (R. H.) Slide Pusher Cam (Oil bearing surfaces)
3 Assembler Star Shaft Oil Hole
4 Assembler Slide Roll Oil Hole
5 Keyboard Rod Shift Key Link Lever Shaft Oil Holes (2) (Except 72-90 machines) *
6 Keyboard Cam Rubber Roll Shaft Oil Holes (4)
7 Assembler Star Idler Pinion Oil Holes (2) *
8 Matrix Delivery Belt Driving Pulley Shaft Oil Hole
9 Assembler Star (Inter.) Gear Oil Hole *
10 Keyboard Cams should be removed and cleaned occasionally and a small drop of oil applied to the pin with a toothpick **
11 Keyboard Rod Shifter Guide Oil Holes (3) (Except 72-90 machines) (Cover must be removed to oil) *
12 Matrix Delivery Belt Idler Pulley Oil Hole
13 Assembler Slide Return Spring Stud Bearing Oil Hole
14 Matrix Delivery Belt Idler Pulley (Aux.) (Small) Oil Hole (Models 30 and 32) *
15 Magazine Elevating Shaft Crank Shaft Oil Hole *
16 Assembling Elevator Lever Shaft Oil Holes (2) *
17 Pi Stacker Support Oil Hole
18 Pi Star Shaft Oil Hole *
19 Matrix Delivery Belt Idler Pulley (Aux.) Oil Hole (Models 30 and 32)
Note: On late machines oil holes will not be found at points 3, 6, 7, 8, 9, 12, 14 and 19. These places are now supplied with Oilite bearings which eliminate the necessity for manual oiling.
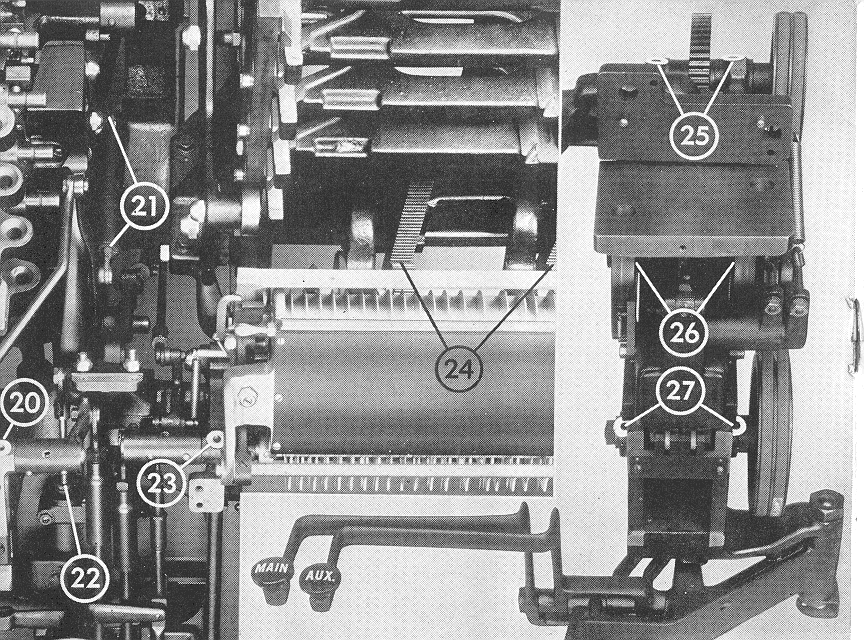
20 Assembler Entrance (Upper) Hinge Shaft Oil Holes (2) (one on each end of Shaft) (Models 29 and 30) *
21 Pivoting Front Guide Holder Balance Spring and Operating Cam Roll (Apply oil to Plunger Rod and Roll) (Models 29 and 30) *
22 Assembler Entrance (Upper) Snubber Piston (Apply oil to Plunger Rod) (Models 29 and 30) *
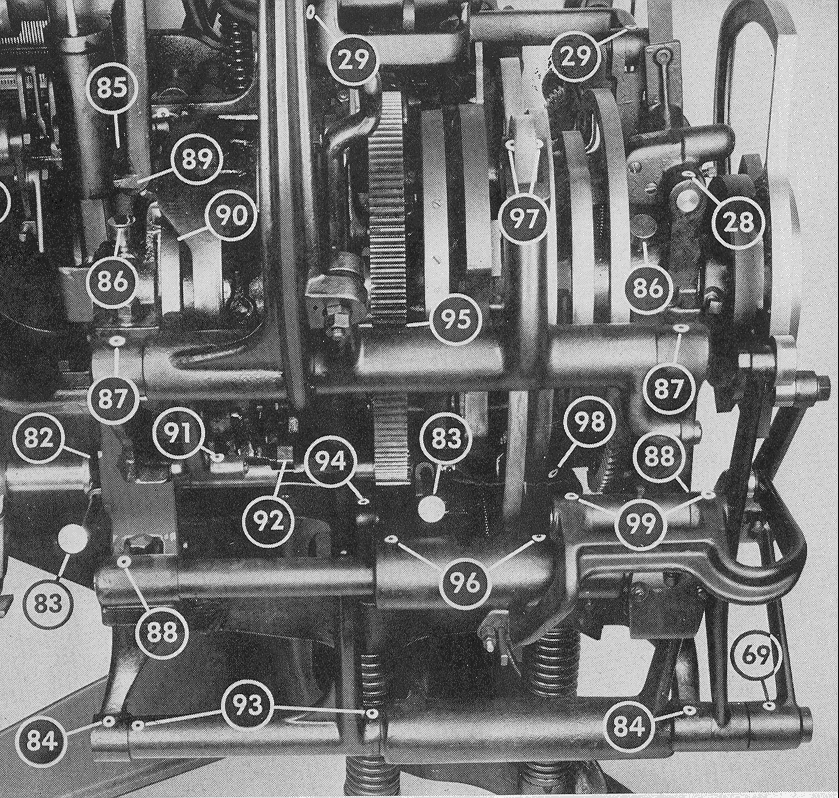
23 Assembler Entrance (Upper) (Aux.) Hinge Shaft Oil Holes (2) (one on each end of Shaft) (Model 30) *
24 Magazine (Aux.) Elevating Pinion Racks and Gears (Models 30 and 32) *
25 Assembler Entrance (Upper) Shift (Inter.) Driving Gear Shaft Oil Holes (one on Model 29) (two on Model 30) **
26 Assembler Entrance (Upper) Finger Key Shift Operating Cams and Rolls (one on Model 29) (two on Model 30) **
27 Assembler Entrance (Upper) Finger Key Shift Operating Cam Shaft Holes (2) (Models 29 and 30) **
Apply oil sparingly to all bearing surfaces not provided with oil holes. Do not allow any oil to get on Assembler Entrance (Upper) Finger Key Shift Roll Cams.
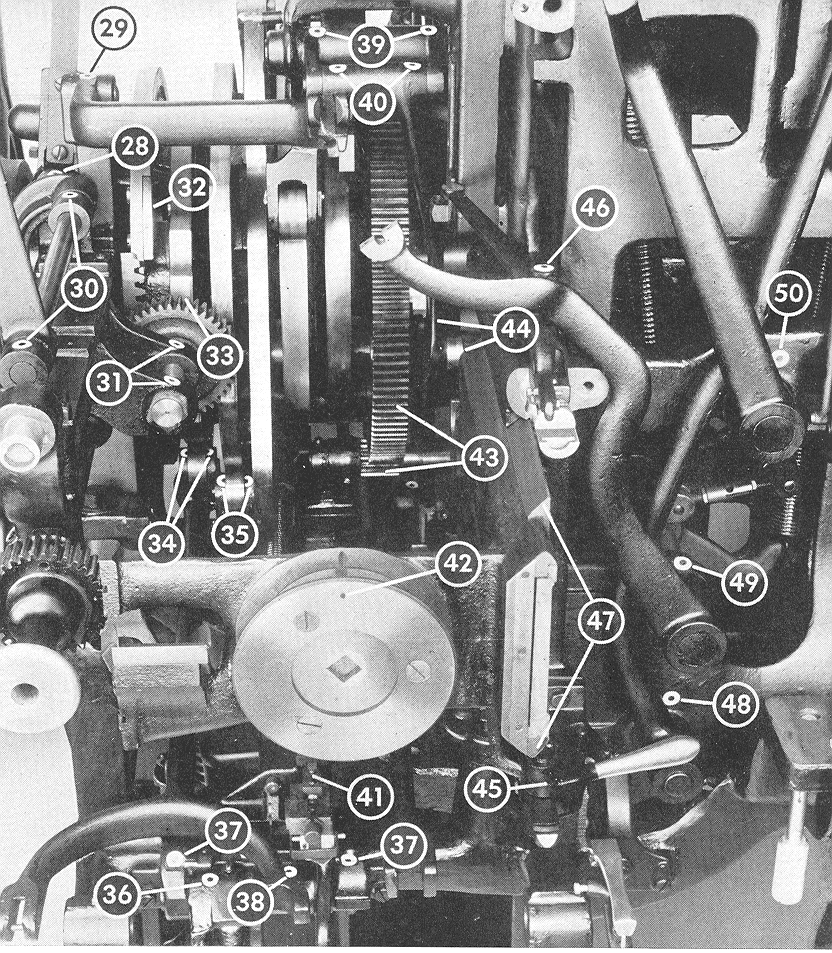
28 Distributor Shifter Lever Shaft Oil Holes (2) (one on each end of shaft) *
29 Pot Pump Lever Oil Holes (3)
30 Pot Crucible Vertical Mouthpiece Wiper Shaft Oil Holes (2) *
31 Mold Turning Square Block Shaft Oil Holes (2) *
32 Mold Turning Cam Shoes (2) (Oil felt on Gear Guard)
33 Mold Turning Bevel Pinion (Apply oil to teeth of Gear and sides of square block) *
34 Vise Closing Cam Roll Oil Holes (2)
35 justification Cam Roll Oil Holes (2)
36 Vise Jaw Locking Toggle Lever Oil Hole (Self-quadder) *
37 Vise Jaw Locking Toggle Lever and Control Rod Lever Shaft Oil Holes (2) (Self-quadder)
38 Vise Jaw Control Rod Lever Oil Hole (Self-quadder) *
39 Mold Cam Lever Handle Oil Holes (2) *
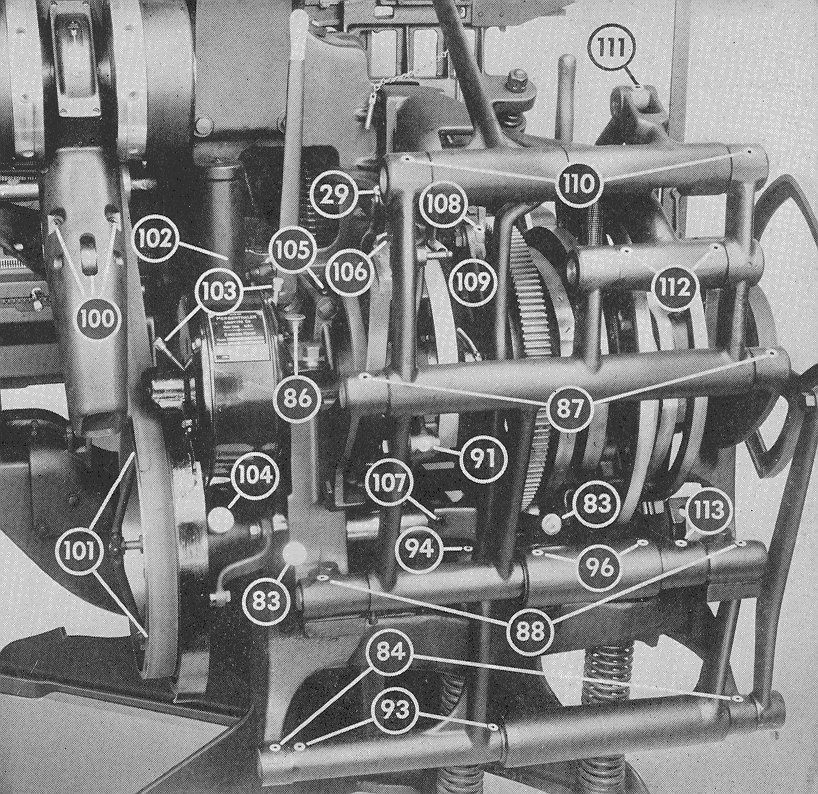
40 Mold Cam Lever Oil Holes (2)
41 Justification Release Cam Lever Slide (Apply oil to bearing surfaces) (Self-quadder) *
42 Mold Disk Bearing Oil Hole
43 Mold Cam and Driving Gear (Apply oil to teeth of Gear) *
44 Mold Cam Roll and Mold Cam Lever Roll (Apply oil to Rolls and Studs) *
45 Starting and Stopping Lever Hinge Pin; also bearing surfaces of Connecting Rod *
46 Pot Pump Lever Stop Lever Operating Lever Oil Hole *
47 Mold Disk Slide (Pull slide part way out and apply oil to bearing surfaces) *
48 Spaceband Lever Shaft Oil Holes (2) (one in front and one in back) *
49 Delivery Slide Lever Shaft Oil Holes (2) (one in front and one in back) *
50 Elevator Transfer Lever Shaft Oil Holes (2) (one in front and one in back) *
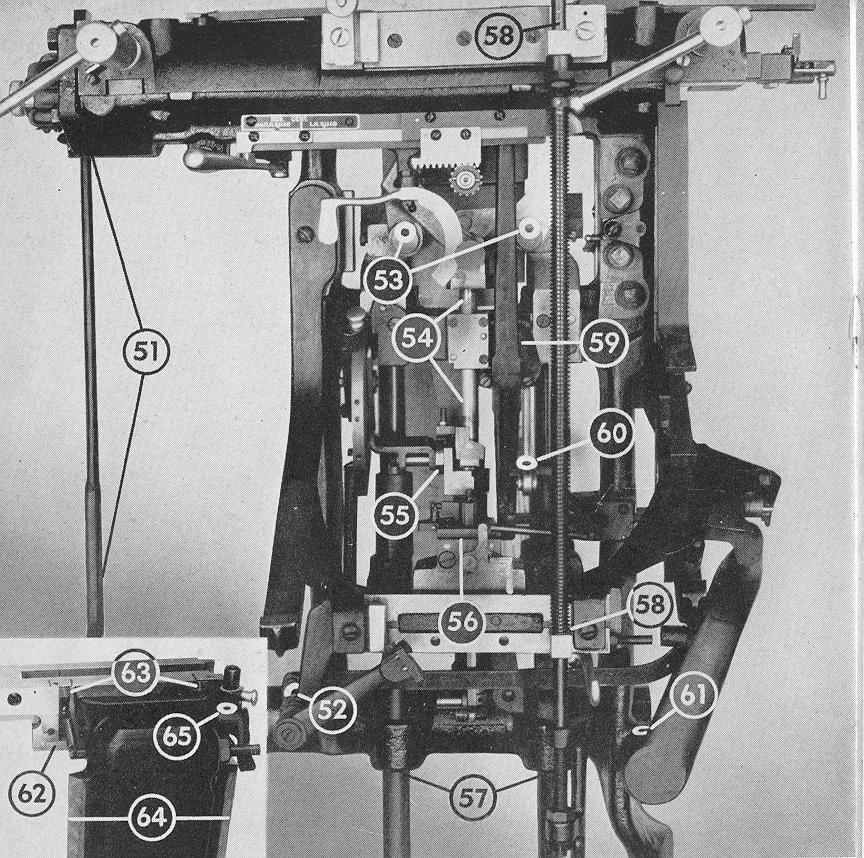
51 Vise jaw (L.H. Wedge (Apply oil to bearing surfaces) *
52 Slug Lever Arm Shaft Oil Hole
53 Vise jaw Operating Lever Fulcrum Stud Oil Grooves (2) (Self-quadder) **
54 Vise jaw Control Rod (Apply oil to sides of Rod) (Self-quadder) **
55 Justification Control Cam (Apply oil to bearing surface) (Self-quadder) **
56 Vise jaw Locking Toggle Adjusting Screw Cam Oil Hole (Self-quadder) **
57 Justification Rods (2) (Apply oil to sides of Rods) *
58 Knife Wiper Bar Rod (Apply oil to sides of Rod) *
59 Mold Disk Dog (Apply oil to sides of Plunger) **
60 Vise Automatic Stop Rod Lever Oil Hole **
61 Slug Lever Oil Hole
62 First Elevator jaw Duplex Rail (Oil sparingly) *
63 First Elevator jaw Duplex Rail Levers (Oil sparingly) *
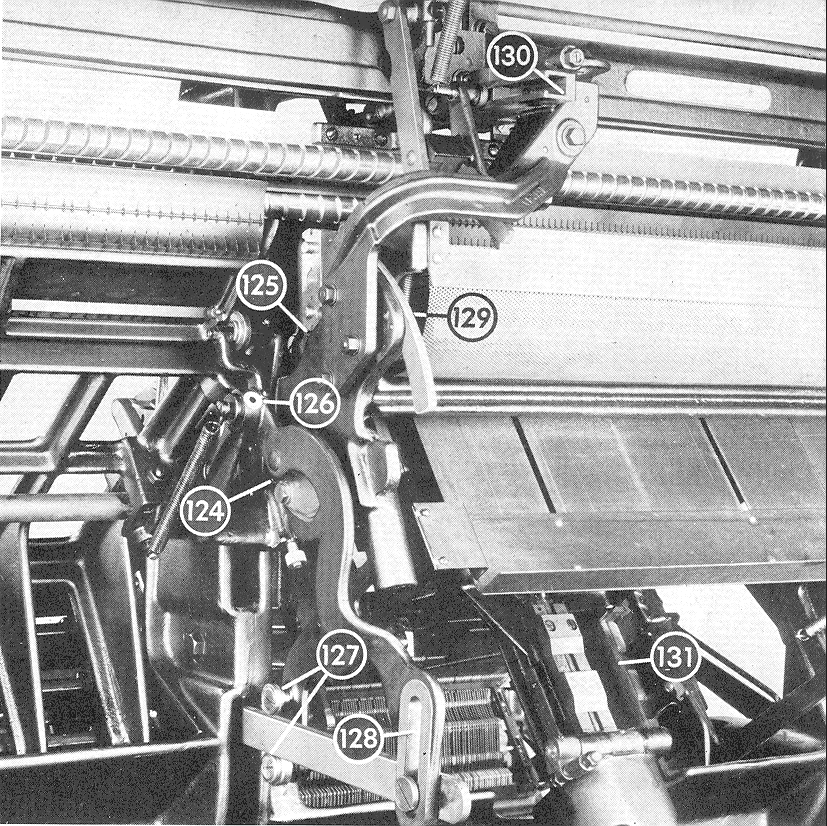
64 First Elevator Slide (Apply oil to bearing surfaces) *
65 Knife Wiper Operating Lever Oil Hole
66 Second Elevator Starting Spring Bolt Hinge Screw (Models 31 and 32)
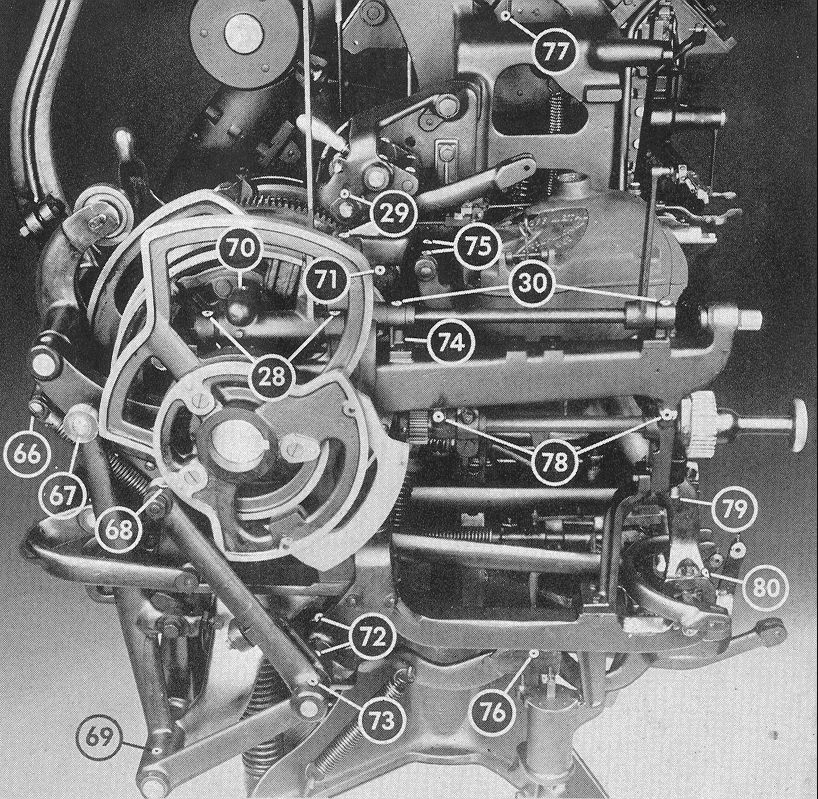
67 First Elevator Cam Roll Oil Hole
68 Vise jaw Locking Toggle Cam Roll Oil Hole (Self-quadder) *
69 Vise jaw Locking Cam Lever Bracket Support Oil Hole (Self-quadder) *
70 Distributor Shifter Cam and Cam Rider *
71 Pot Pump Lever Roll Oil Holes (2)
72 Vise jaw Locking Toggle Cam Lever Extension Arm Oil Holes (2) (Self-quadder) *
73 Vise jaw Locking Toggle Cam Roll Lever Oil Hole (Self-quadder) *
74 Pot Cam Roll Oil Holes (2)
75 Pot Lever Oil Holes (2) *
76 Vise jaw Locking Toggle Lever Roll Oil Hole (Self-quadder) *
77 Magazine Locating Block Support Lever Shaft Oil Holes (2) (one at each end of shaft) *
78 Mold Disk Pinion Shaft Oil Holes (2) *
79 Mold Disk Guide Support Screw Grease Cup §
80 Pot Leg Bushing Oil Holes (2) (one on each leg)
81 Intermediate Shaft Driving Belt Idler Pulley Oil Cup (72-90 machines) *
82 Driving Shaft Clutch Flange (Oil bearing surfaces) *
83 Driving Shaft Bearing Grease CUPS (2) §
84 First Elevator and Ejector Lever Shaft Oil Holes (2) *
85 Delivery Lever Cam Roll and Pin
86 Cam Shaft Grease Cups (2) §
87 Second Elevator Lever Shaft Oil Holes (2) *
88 Justification and Vise Closing Lever Shaft Oil. Holes (2) * .
89 Elevator Transfer Cam Roll Oil Hole
90 Delivery and Elevator Transfer Cam (Oil bearing surface) *
91 Second Elevator Safety Pawl Oil Hole *
92 Delivery Cam Shoe (Oil bearing surface) *
93 Ejector Lever Oil Holes (2)
94 Vise Closing Lever Spring Rod Oil Hole *
95 Pot Return Cam (Oil bearing surface) *
96 Justification Lever Oil Holes (2)
97 Second Elevator Cam Roll Oil Holes (2) *
98 Justification Lever Spring Rod Oil Hole
99 Justification Release Cam Lever Oil Holes (2) (Self-quadder)
100 Magazine Elevating Shaft Anti-Friction Rolls (6) *
101 Driving Shaft Friction Shoe Rods and Pins *
102 Delivery Air Cushion Piston Fulcrum Screw *
103 Motor Armature Bearing Grease Cups (2) (NOTE: A medium ball-bearing grease should be used on the type of motor illustrated. For older style motors having oil cups, use Linotype oil X-24.)
104 Motor Driving Pulley Grease Cups §
105 Vertical Starting Lever Shaft *
106 Automatic Safety Pawl and Automatic Stopping Pawl (Oil bearing surfaces and hinge pins) *
107 Ejector Lever Shoe (Oil bearing surface) *
108 Ejector Lever Adjustable Pawl Plate (Oil bearing surface) *
109 Ejector Lever Adjusting Pawl Oil Hole *
110 Second Elevator Lever Shaft Oil Holes (2) (Models 29 and 30) *
111 Second Elevator Lever Link Oil Holes (2) (Models 29 and 30) *
112 Second Elevator Cam Lever Oil Holes (2) (Models 29 and 30)
113 Vise Closing Lever Oil Hole *

114 Magazine (Aux.) Elevating Pinion Rack Guide Roll Oil Holes (2) (Oil holes are in face of Roll) (Models 30 and 32) *
115 Magazines (Aux.) Frame Elevating Shaft Gears (Models 30 and 32) *
116 Magazine (Aux.) Elevating Shaft Universal joints (2) (Models 30 and 32) *
117 Magazine Elevating Shaft Clutch (one on Models 29 and 31) (two on Models 30 and 32) (Oil bearing surfaces) *
118 Magazine (Aux.) Frame Guide Rolls (4) (Models 30 and 32) *
119 Intermediate Shaft Grease Cups (2) §
120 Assembler Driving Pulley Shaft Grease Cup §
121 Intermediate Shaft Bevel Gear and Assembler Driving Belt Gear *
122 Keyboard Rod Lever Slide Link and Cam Roll Lever Shaft Oil Holes (3) (Models 31 and 32 [72-90]) *
123 Magazine Elevating Shaft Universal joints
124 Distributor Screw Guard Safety Lock (Oil bearing surfaces) (Models 31 and 32 [72-90]) **
125 Channel Entrance Revolving Block (Oil bearing surfaces) (Models 31 and 32 [72-90]) **
126 Channel Entrance Frame Control Lever Link Oil Holes (2) (one hole on front of Link) (Models 31 and 32 [72-90]) *
127 Channel Entrance Control Lever Link Guide Rolls (Oil studs) (Model 32 [72-90])
128 Channel Entrance Control Lever Link (Long) (Oil bearing surfaces) (Model 32 [72-90]) *
129 Channel Entrance Revolving Cams (Oil bearing surfaces) (Models 31 and 32 [72-90]) **
130 Distributor Bar Shifter Guide (Oil bearing surfaces) (Models 31 and 32 [72-90]) **
131 Magazine Frame (Lower) Guide Rails (2) (one on each side of frame) (Oil bearing surfaces) (Models 31 and 32)
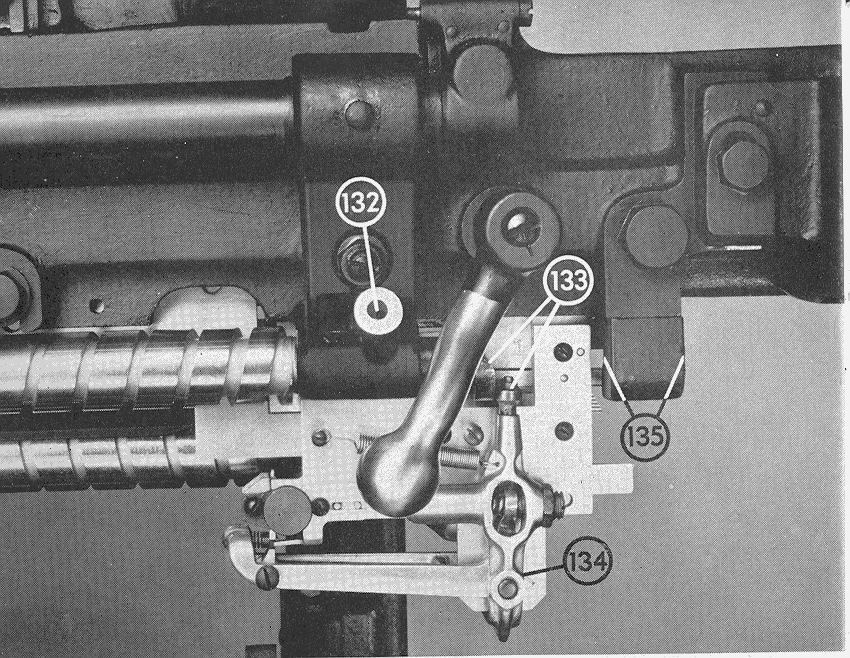
132 Distributor Back Screw Oil Holes (2) (one hole at other end of screw) (Models 31 and 32) t
133 Distributor Box Matrix Lift Cam and Roil (Models 31 and 32) t
134 Distributor Box Matrix Lift Cam Lever Oil Holes (2) (Models 31 and 32) t
135 Second Elevator Guide (Upper) (Oil bearing surfaces)
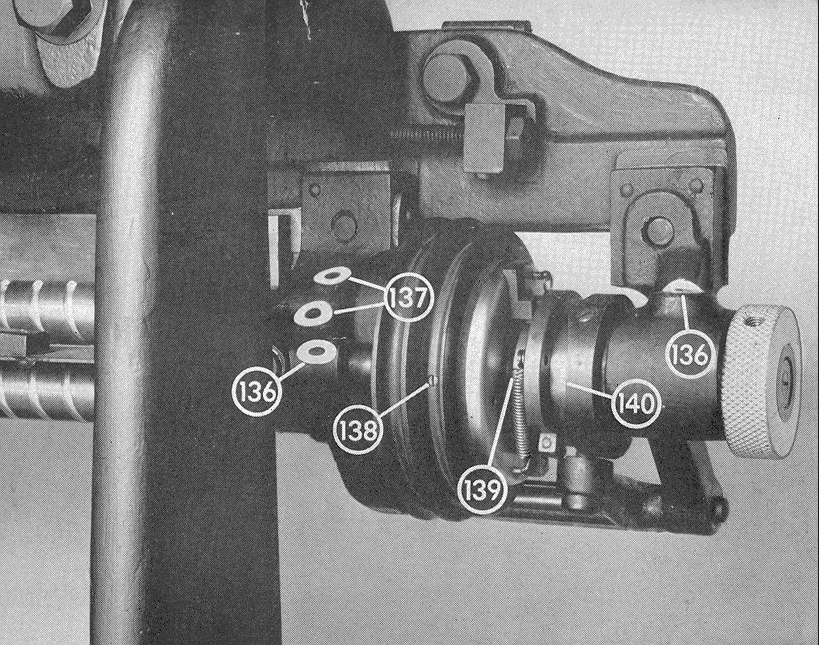
136 Distributor Clutch Shaft Oil Holes (2) t
137 Distributor Front Screw Oil Holes (4) (one hole at other end of each screw) (Models 31 and 32) f
138 Distributor Clutch Pulley Oil Hole (Remove screw to oil) f
139 Distributor Clutch Pulley Washer Flange Oil. Hole t
140 Distributor Clutch Flange Collar (Oil bearing surface) f
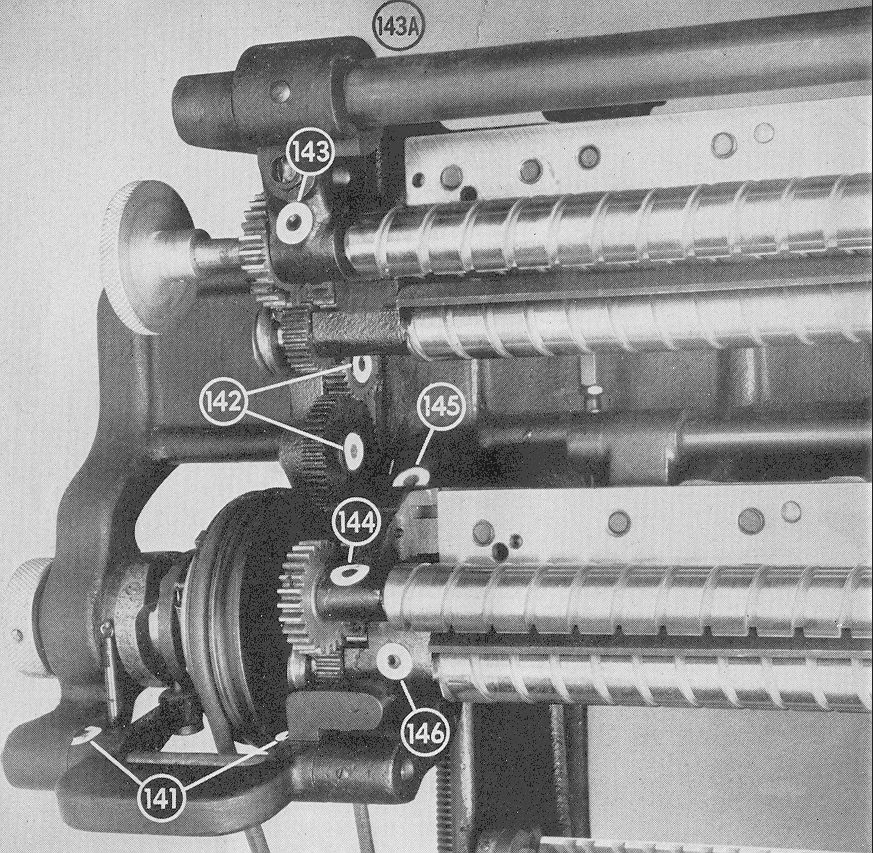
141 Distributor Clutch Lever Oil Holes (2) (Models 29 and 30) t
142 Distributor Screw Idler Gear Stud Oil Holes (4) (holes in head of each stud) (Models 29 and 30) t
143 Distributor Back Screw (Upper Set) Oil Holes (2) (one hole at other end of screw) (Models 29 and 30) t
143a Distributor Front Screw (Upper Set) and Distributor Lower Screw (Upper Set) Oil Holes (4) (one hole at each end of each screw-visible from top of machine) (Models 29 and 30) t
144 Distributor Back Screw (Lower Set) Oil Holes (2) (one hole at other end of screw) (Models 29 and 30) t
145 Distributor Front Screw (Lower Set) Oil Tube (one hole at other end of screw) (Models 29 and 30) t
146 Distributor Lower Screw (Lower Set) Oil Holes (2) (one hole at other end of screw) (Models 29 and 30) t
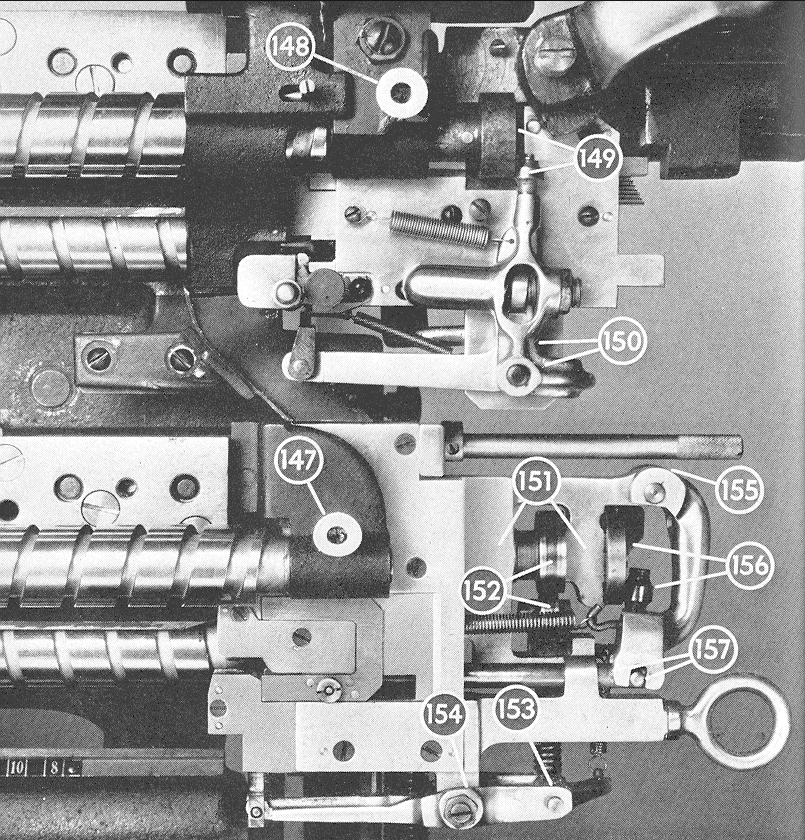
147 Distributor Back Screw (Lower Set) Oil Holes (2) (one hole at other end of screw) (Models 29 and 30) t
148 Distributor Back Screw (Upper Set) Oil Holes (2) (one hole at other end of screw) (Models 29 and 30) t
149 Distributor Box (Upper) Matrix Lift Cam and Roll (Models 29 and 30) t
150 Distributor Box (Upper) Matrix Lift Cam Lever Oil Holes (2) (Models 29 and 30) t
151 Distributor Box (Lower) Cam Shaft Bearing Oil Holes (2) (holes are in front of box) (Models 29 and 30) t
152 Distributor Box (Lower) Matrix Lift Cam and Roll (Models 29 and 30) t
153 Distributor Box (Lower) Matrix Lift Lever Oil Hole (Models 29 and 30)
154 Distributor Box Matrix Lift Lever Fulcrum Screws (2) (Models 29 and 30) t
155 Distributor Box (Lower) Matrix Pusher Slide Lever Oil Hole (Models 29 and 30) t
156 Distributor Box (Lower) Matrix Pusher Slide Lever Cam and Roll (Models 29 and 30) t
157 Distributor Box (Lower) Matrix Slide Lever Fulcrum and Pusher Rods (Models 29 and 30) t